SkyEye Viewer/Editor
The SkyEye Viewer program provides an easy and convenient method to view images captured with the SkyEye2 camera system.
Images can be viewed one frame at a time or played as a movie at a user adjustable rate.
Additionally, videos can be created from complete image sets or a portion of an image set.
Launch the SkyEye Viewer by selecting it from the 'Options' drop down menu or by clicking the  icon in the 'Tool Strip'.
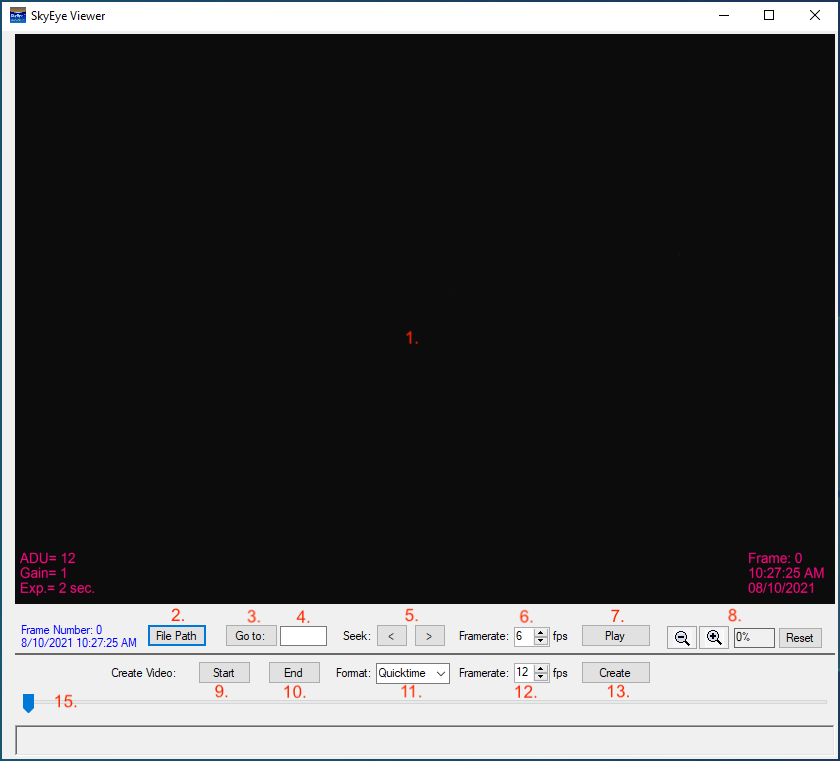
When the SkyEye Viewer/Editor is initially launched, the function will automatically load the most recent file set. The first image in the set will
appear in the (1.) preview window.
If you would prefer to load a different set of images, click the (2.) 'File Path' button to navigate to the image set.
After the image set has loaded, the images can be viewed in a variety of ways.
If you would like to examine a certain frame, enter the frame number in the 'Go to:' text field (4.) and then click the (3. )"Go to:' button.
Alternatively, if you prefer to scan through the images, use the 'Seek' buttons (5.) to view the images one at a time.
![]() Holding either of the 'Seek' buttons down will continuously load and display the next (or previous) image in the sequence at a increasingly more rapid rate.
Holding either of the 'Seek' buttons down will continuously load and display the next (or previous) image in the sequence at a increasingly more rapid rate.
The upper 'Framerate' control (6.) will adjust the playback frame rate when playing the frames back when using the (7.) 'Play' function.
Clicking the 'Play' button will play through the file set.
The zoom in and out buttons (8.) can be used to zoom in (or out) of a region of interest in the preview window. Doing so will reveal a set of scroll bars that can be used to
find a certain portion of the image. To restore the view to the default image size, click the 'Reset' button.
![]() The entire Editor dialog size can be adjusted by clicking and dragging on one of the corners of the dialog in the normal Windows™ fashion.
The entire Editor dialog size can be adjusted by clicking and dragging on one of the corners of the dialog in the normal Windows™ fashion.
Doing so will also "stretch' the currently displayed image. It may be desirable to click the 'Reset' button in order to entirely fill the display window
after re-sizing the window.
Videos of the entire image set (or portions of) can easily be created. Use any of the controls to display the image that you would like to be the first image of the
video then click the 'Start' button (9.). Next, use any of the controls to display the image that you would like to be the final image of the video and click the 'End' button (10.).
Set the video format type using the 'Format' (11.) drop down control. (The default "QuickTime" is most likely the best choice as it is compatible with most platforms).
Set the 'Framerate' control (12.) to the desired rendering frame rate.
Now, click the 'Create' button (13.). A message will appear displaying that the rendering process is taking place. Rendering videos is a CPU intensive task which may take
some time to complete, please be patient.
When the rendering process has completed, a message dialog will be displayed indication the the process has finished.

At this point, you can choose whether to play the video in your default Windows™ video player, open the folder containing the video or exit the process.
The default name of the video is "SkyeyeVideo".
![]() Note: Video processing requires that the files to be processed reside on the same computer as the viewer/editor. Files on a NAS or network drive
Note: Video processing requires that the files to be processed reside on the same computer as the viewer/editor. Files on a NAS or network drive
cannot be rendered with this process.
The track bar (15.) can be used to rapidly move to any frame of the current frame set. Additionally, the track bar will show the relative location of the current frame
when the frames are 'played' or the current frame is selected using any of the other controls.
![]() Note: Due to the PC resources the SkyEye2 program uses while imaging, it is best practice to use the Editor/Viewer when the acquisition sequence is not running.
Note: Due to the PC resources the SkyEye2 program uses while imaging, it is best practice to use the Editor/Viewer when the acquisition sequence is not running.